ERP Demo Project
This tutorial shows how to setup a more complex application like an ERP. The SQL structure of this demo was formerly used within a real-world Qt application. Now all the tables will be provided as a REST API instead.
Note
This demo shows:
the backend: how provide complex SQL tables via a REST API
a frontend: how to present all tables each in a datatables jQuery component using a generic UI (but which is not very suited for this complex application)
it also shows how to introduce your own business logic
Also note that this ERP project is a very customer specific project for a small mechanical factory with very specific needs. So you will not be able to directly use it without changes - and it’s not complete anyway.
Prerequisites
Note
This section describes how to get the database conversion and extraction tools. And maybe you’re new to flask-squirrel so it is easier to fetch the package and integrate it as a developer package where you can debug it and set breakpoints in your favorite IDE.
In principle, you could also just install it with pip: pip install flask-squirrel
So do the following steps for a developer setup - here /home/dev will be used as base directory for this demo project.
cd /home/dev
git clone https://github.com/ClNo/flask-squirrel.git
# this directory will later be used for a "venv" developer link (instead of pip install)
Now create the erp project:
cd /home/dev
mkdir erp-backend
cd erp-backend
python3 -m venv venv
source venv/bin/activate
pip install --upgrade pip
cd ../flask-squirrel
python setup.py develop
cd ../erp-backend
You could check now if flask-squirrel has been installed:
python3
import flask_squirrel
# if you get no errors here it's installed correctly as developer setup
Re-activate Virtual Env
If you stop your work and later need to re-activate the Python environment do the following steps:
cd /home/dev/erp-backend
source venv/bin/activate
# start your Python work here, you're in :)
SQL Table Definition
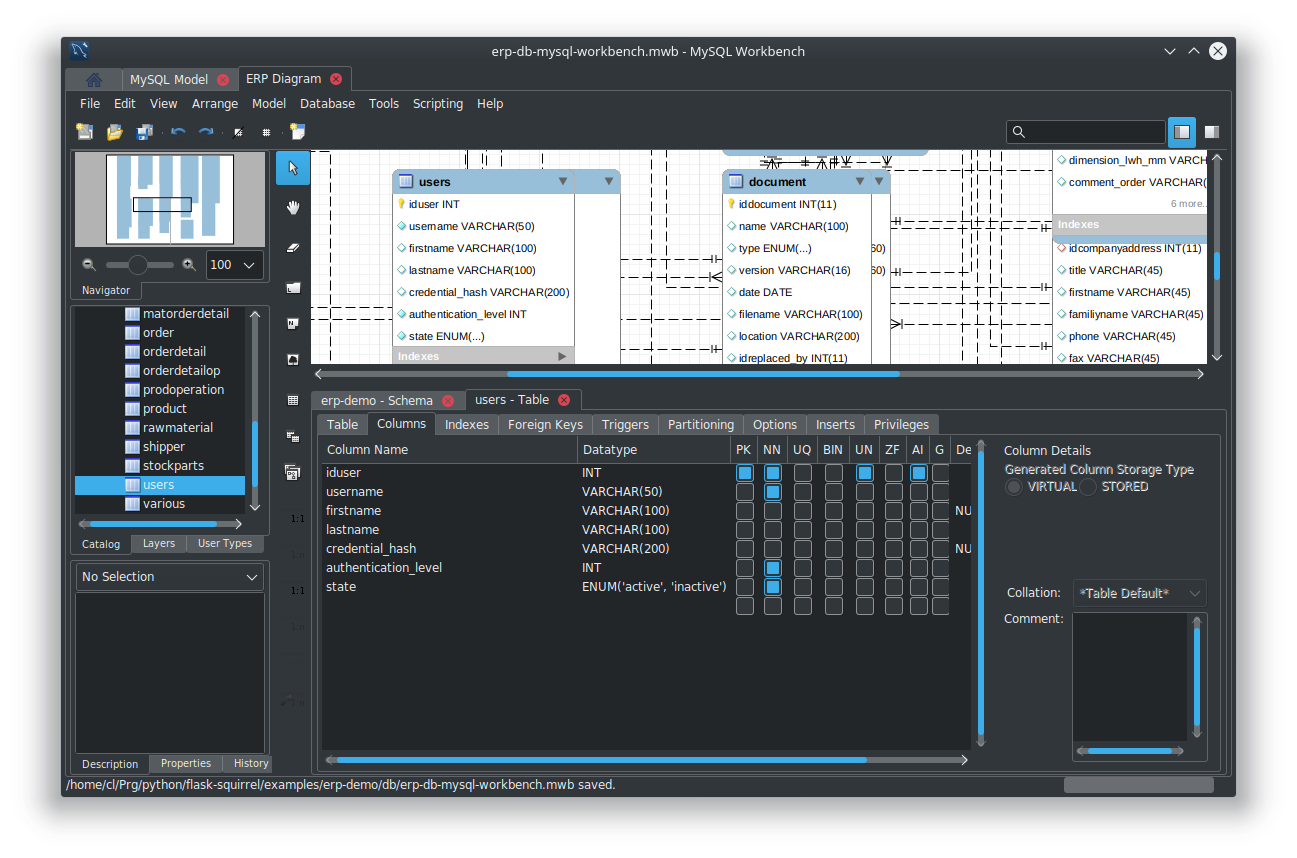
This tutorial uses an existing database model which has been created using the graphical database tool MySQL Workbench.
What you will do next to give you an overview:
copy the MySQL Workbench project and modifiy it if you want
copy the SQL creation file or generate a new one
convert it to a SQlite file
extract the database structure and generate files for the backend:
databse structure JSON file
translation JSON file
custom view specification JSON file
For step 1 and 2 you could do it this way:
cd /home/dev/erp-backend
mkdir db
cp ../flask-squirrel/examples/erp-demo/db/erp-db-mysql-workbench.mwb db/
cp ../flask-squirrel/examples/erp-demo/db/erp-db-mysql-workbench.sql db/
cp ../flask-squirrel/examples/erp-demo/db/erp-db-initial-data.sql db/
If you like to modify the database open it in the MySQL Workbench, edit the tables and export the SQL commands like this:
Menu File > Export > Forward Engineer SQL CREATE Script…
Output SQL Script File:
/home/dev/erp-backend/db/erp-db-mysql-workbench.sql(replace existing)Do not check anything, just go “> Next”
Only check “Export MySQL Table Objects”, go “> Next”
Check the output, write the file “> Next”
For instance, the users table will look like this:
-- -----------------------------------------------------
-- Table `erp-demo`.`users`
-- -----------------------------------------------------
CREATE TABLE IF NOT EXISTS `erp-demo`.`users` (
  `iduser` INT UNSIGNED NOT NULL AUTO_INCREMENT,
  `username` VARCHAR(50) NOT NULL,
  `firstname` VARCHAR(100) NULL DEFAULT NULL,
  `lastname` VARCHAR(100) NULL,
  `credential_hash` VARCHAR(200) NULL DEFAULT NULL,
  `authentication_level` INT NOT NULL,
  `state` ENUM('active', 'inactive') NOT NULL,
  PRIMARY KEY (`iduser`))
ENGINE = InnoDB
DEFAULT CHARACTER SET = utf8;
Warning
A “users” table with a username and a credential field must exist! Maybe you want to insert the “users” table SQL statements from the Orderings demo and insert it into your table. An initial admin user will be created automatically according to the erp-config.json config file.
Ok, step 1 and 2 have been done. Now we arrive at step 3 and have to convert the MySQL syntax to SQlite as we use a single SQlite database instead of a separate server which makes it a bit easier for this tutorial.
cd /home/dev/erp-backend
python ../flask-squirrel/flask_squirrel/tools/mysql_to_sqlite_convert.py db/erp-db-mysql-workbench.sql db/erp-db-sqlite.sql
Now step 1, 2 and 3 have been done so let’s extract some data which is used for the backend.
Create JSON DB specification File
Now we have to extract the database structure and generate a the so-called database specification file. But we now have two SQL files:
the MySQL Workbench export in
db/erp-db-mysql-workbench.sqlthe SQlite file in
db/erp-db-sqlite.sql
Which one should you use a source for the generation of the JSON file? My recommendation is to use the MySQL Workbench Export as it is the “source of the source”. In this case here it has even some advantages: it contains some fields with the enum column type which will be lost in SQlite conversion as SQlite does not know this type. The JSON file will contain those enum values and provide it to the frontend which will give a selection list at the end.
mkdir rest-config
python ../flask-squirrel/flask_squirrel/tools/extract_dbspec.py db/erp-db-mysql-workbench.sql rest-config/db_spec.json
Create Customview JSON File
Now we have a list of all tables and columns/fields defined in the db_spec.json file. But in most cases
you don’t want to show each field to the user on the frontend. Or sometimes you only want to show a field
as read only which is not editable by the frontend user but will be written for instance by the business logic
in the backend.
That’s why you need a configuration file called db_customview_spec.json containing the behaviour of
the frontend.
Note
For now, all tables must appear in the db_customview_spec.json file. If it does not, an exception will appear on
accessing every API resource. This will be fixed in the future.
Here, an initial file containing all the tables and fields will be created using a helper script:
python ../flask-squirrel/flask_squirrel/tools/initial_customview_translation.py rest-config/db_spec.json rest-config/db_customview_spec.json rest-config/translation.json
The generated file db_customview_spec.json no contains references to the foreign table and
which name should be displayed in the frontend. The Python script tries to automatically guess those
foreign key names (“ref_text”). This looks like that (just two tables shown here):
{
"orderdetail": {
  "_attributes": [],
  "_predefined_filters": {},
  "idorder": { "ref_text": ["order.customer_orderno", "order.customer_refdoc"] },
  "idproduct": { "ref_text": ["product.name"] },
  "idrawmaterial": { "ref_text": ["rawmaterial.material", "rawmaterial.dimension"] }
},
"users": {
  "_attributes": ["write_table_admin"],
  "username": { "_attributes": ["unique"] },
  "credential_hash": { "_attributes": ["password"] },
  "_predefined_filters": {}
}
}
So the foreign key to the “order” table will use the columns “order.customer_orderno” and “order.customer_refdoc” to be shown on the GUI selection list.
The “users” table configuration ist also added automatically and will be protected with the attribute “write_table_admin” which means that only the admin can write into it.
Attribute |
Meaning |
|---|---|
“_attributes”: [“write_table_admin”] |
only admins can write this table |
“_attributes”: [“write_everyone”] |
everyone can write this table |
An other config file has also been created at the same time: translation.json.
Create the Translation
The translation.json contains the name of the column/field which will be displayed on the
frontend as table column or in the editor as field name. The automatically created file just
contains the database names:
{
  "orderdetail": {
    "orderdetail": {"en": "orderdetail"},
    "idorderdetail": {"en": "ID"},
    "idorder": {"en": "order.idorder"},
    "idproduct": {"en": "product.idproduct"},
    "idrawmaterial": {"en": "rawmaterial.idrawmaterial"},
    "name": {"en": "name"},
    "supplier_prodno": {"en": "supplier_prodno"},
    "supplier_drawno": {"en": "supplier_drawno"},
    "amount": {"en": "amount"},
    "amount_unit": {"en": "amount_unit"},
    "amount_from_stock": {"en": "amount_from_stock"},
    "tax": {"en": "tax"},
    "comment_offer": {"en": "comment_offer"},
    "comment_production": {"en": "comment_production"},
    "comment_invoice": {"en": "comment_invoice"},
    "comment_external": {"en": "comment_external"},
    "comment_delivery": {"en": "comment_delivery"},
    "length_rawmaterial_beforesawn_mm": {"en": "length_rawmaterial_beforesawn_mm"},
    "length_rawmaterial_order_mm": {"en": "length_rawmaterial_order_mm"},
    "price_internal": {"en": "price_internal"},
    "price_externalop": {"en": "price_externalop"},
    "price_reduction_perc": {"en": "price_reduction_perc"},
    "price_reduction_abs": {"en": "price_reduction_abs"},
    "price_customer": {"en": "price_customer"},
    "price_currencystr": {"en": "price_currencystr"},
    "price_initial_notax": {"en": "price_initial_notax"},
    "price_per_piece_notax": {"en": "price_per_piece_notax"},
    "price_average_per_piece": {"en": "price_average_per_piece"},
    "time_production_min": {"en": "time_production_min"},
    "units_fromstock": {"en": "units_fromstock"},
    "units_toproduce": {"en": "units_toproduce"},
    "state": {"en": "state"},
    "state.incoming": {"en": "incoming"},
    "state.offer": {"en": "offer"},
    "state.ordered": {"en": "ordered"},
    "state.wait": {"en": "wait"},
    "state.production": {"en": "production"},
    "state.external": {"en": "external"},
    "state.ready": {"en": "ready"},
    "state.delivered": {"en": "delivered"},
    "state.invoiceopen": {"en": "invoiceopen"},
    "state.done": {"en": "done"},
    "date_scheduled": {"en": "date_scheduled"},
    "date_plannedstart": {"en": "date_plannedstart"},
    "date_expectedready": {"en": "date_expectedready"},
    "orderposition": {"en": "orderposition"},
    "ordersubposition": {"en": "ordersubposition"},
    "rawmatorder_state": {"en": "rawmatorder_state"},
    "date_rawmatorder": {"en": "date_rawmatorder"},
    "_editor": {
      "table_multi": {"en": "orderdetail"},
      "table_single": {"en": "orderdetai"},
      "article": {"en": "a"}
    }
}
You need to edit the names in order to be displayed as human readable and in multiple languages as you need. For instance the line
"orderdetail": {"en": "orderdetail"},
should be written and translated like this:
"orderdetail": {"en": "order item", "de": "Bestellposition"},
Also note some details here:
The values of the
enumdata type are expanded for instance like this:state.incomingwhere every value can be translated.The frontend editor needs some texts for the title of the popup which also must be provided in the
_editorsection.Also read the documentation in Translation
Note
All tables must appear in the translation JSON file. If it does not, an exception will appear on accessing every resource.
Create the REST API Config File
erp-config.json describes everything you need to run the backend:
{
  "listening_ip": "0.0.0.0",
  "listening_port": 5000,
  "api_path": "erp-api",
  "version": "00.01.00",
  "flask-debug": false,
  "login_expiration_seconds": 86400,
  "static_directory": "/home/dev/erp-backend/frontend",
  "static_url": "erp",
  "db_uri": "sqlite:///./erp-db.sqlite",
  "db_type": "sqlite",
  "db_spec": "rest-config/db_spec.json",
  "customview_spec": "rest-config/db_customview_spec.json",
  "translation_spec": "rest-config/translation.json",
  "create_not_existing_dirs": true,
  "upload_dir": "./upload_dir",
  "file_url_path": "/erp-upload-files",
  "archive_dir": "./erp_archive",
  "archive_url_path": "/erp-archive-dir",
  "session_dir": "./erp_sessions",
  "default_admin_user": {"username": "admin", "password": "adm123", "authentication_level": 10, "firstname": "John", "lastname": "Test"},
  "SECRET_KEY": "_5#y2LF4Q8z-\\xec]/",
  "SESSION_COOKIE_SAMESITE": "Lax",
  "SESSION_COOKIE_SECURE": true
}
Place it in the main project directory (see an example structure below).
Note
The keys static_directory and static_url are optional and are only used for providing the static
files of the frontend via Flask as file server. static_directory seems to an absolute path otherwise it doesn’t work.
Insert the Test Data
This initial test data is based on real-world DB with scrambled texts:
sqlite3 erp-db.sqlite -init db/erp-db-initial-data.sql
Run the Backend
Warning
You can only run the backend if you have an existing database erp-db.sqlite.
So you can’t skip any of the steps described above!
Check your project main directory which should look like this:
(venv) user@myhost:/home/dev/erp-backend$ ls -l
drwxrwxr-x 2 user user       4096 Okt 17 23:27 db
-rw-rw-r-- 1 user user        853 Okt 17 23:54 erp-config.json
-rw-r--r-- 1 user user     724992 Okt 17 23:31 erp-db.sqlite
drwxrwxr-x 6 user user       4096 Okt 17 23:19 frontend
drwxrwxr-x 2 user user       4096 Okt 17 23:28 rest-config
drwxrwxr-x 2 user user       4096 Okt 17 23:37 upload_dir
drwxrwxr-x 6 user user       4096 Okt 17 23:19 venv
As we currently don’t have any business logic we can directly run the backend like this:
python -m flask_squirrel.startup.flask_main erp-config.json
Testing the REST API
Now you could test the API using curl or any other tool for a REST API access.
curl http://127.0.0.1:5000/erp-api/company

# or for formatted JSON output:
curl http://127.0.0.1:5000/erp-api/company | jq
Frontend Folder
At least, create a folder called ‘frontend’ which the erp-config.json is referring to. Flask will serve this folder as static web application files to the browser. In a later project stage, this folder should be served by a webserver instead of using Flask.
Here, the common JS/jQuery/datatables “Orderings”-frontend will be used as base and modified for the purpose of the ERP.
Copy the Frontend
The frontend will initially be copied from the “Orderings” demo and modified so it can be used for the ERP solution. It will be a very raw frontend - but could be used this way. For user friendly UIs you should consider using Vue.js, Angular or something similar.
For now, copy everything from the demo orderings/frontend/ to erp-backend/frontend/. Make sure you have the DataTables Editor in the folder frontend/DatatablesEditor/ which is commercial. You can download a trial version for just testing.
In the JS world do the following follwing changes:
TableUtils.apiPath: change it frpm ‘/orderings-api’ to ‘/erp-api’
main.js, navbarItems: specify the tables you want to access
language.js: do the translations; at least the impartant ones
Provide and Run the Frontend
If you have specified the keywords static_directory and static_url in the REST API config file erp-config.json, the
static frontend files will be provided by the Flask server:
http://127.0.0.1:5000/erp/index.html
And the browser will show a “default” frontend where the specified tables will be presented:
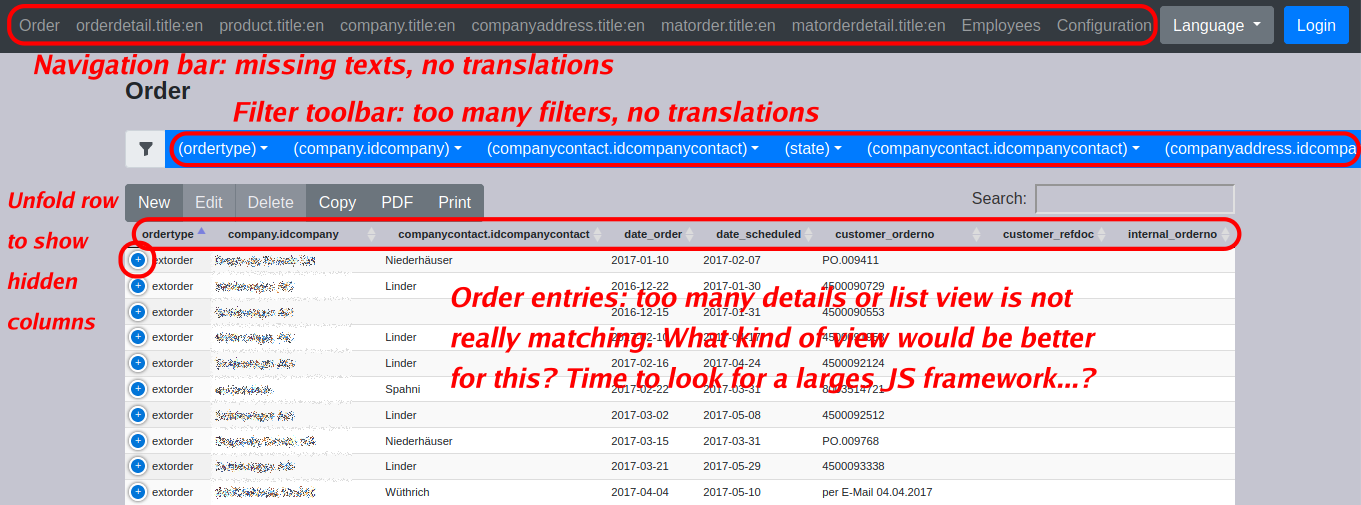
Note
Conclusion: for complex application like an ERP you should consider using a powerful JavaScript framework like Vue.js, React, Angular oder many others.